Japanese Katsu Bowls: A Delicious Guide to Making Authentic Katsu at Home
Enjoy a delicious homemade Chicken Katsu served with perfectly seasoned rice and a tangy sauce. This crispy, golden-brown dish is a Japanese favorite that’s sure to impress! Japanese Katsu Bowls: A Delicious Guide to Making Authentic Katsu at Home is not only easy to prepare but also perfect for family dinners or casual get-togethers.
Why You’ll Love This Recipe
- Crispy Perfection: The combination of panko breadcrumbs and frying creates an irresistible crunch that elevates the dish.
- Flavorful Sauce: The homemade tonkatsu sauce adds a sweet and tangy kick that complements the katsu beautifully.
- Versatile Ingredients: You can easily substitute chicken with beef or turkey, allowing you to cater to different tastes.
- Quick Prep Time: With just an hour from start to finish, you can whip up this delightful meal even on busy weeknights.
- Family-Friendly: Kids will love this tasty dish, making it a great option for family dinners.
Tools and Preparation
Creating your own Japanese Katsu Bowls is simple with the right tools. Here’s what you’ll need for this recipe.
Essential Tools and Equipment
- Skillet
- Saucepan
- Mixing bowl
- Meat mallet or rolling pin
- Tongs
- Paper towels
Importance of Each Tool
- Skillet: Ideal for frying the katsu, ensuring even cooking and a perfect crispiness.
- Saucepan: Necessary for preparing the rice, which is key to complementing the katsu.
- Mixing bowl: Used for combining ingredients like sauces or seasoning mixtures effectively.
- Meat mallet or rolling pin: Helps achieve uniform thickness in chicken breasts, allowing for even cooking.
Ingredients
Enjoy a delicious homemade Chicken Katsu served with perfectly seasoned rice and a tangy sauce. This crispy, golden-brown dish is a Japanese favorite that’s sure to impress!
For the Katsu
- 2 boneless chicken breasts (or beef loin, if preferred)
- Salt and pepper, to taste
- 1 cup all-purpose flour
- 2 large eggs
- 1 cup panko breadcrumbs
- Vegetable oil, for frying
For the Rice
- 2 cups Japanese short-grain rice
- 2 ½ cups water
- 1 tablespoon rice vinegar
- 1 tablespoon sugar
- ½ teaspoon salt
For the Sauce
- ¼ cup tonkatsu sauce (or store-bought if you prefer)
- 1 tablespoon soy sauce
- 1 teaspoon Worcestershire sauce
- 1 teaspoon ketchup
For Garnishing
- 1 cup shredded cabbage
- 2 green onions, sliced
- Sesame seeds, for garnish
- Pickled ginger (optional)
How to Make Japanese Katsu Bowls: A Delicious Guide to Making Authentic Katsu at Home
Step 1: Rinse the Rice
Rinse the rice under cold water until the water runs clear. This helps remove excess starch.
Step 2: Soak the Rice
Transfer the rinsed rice to a saucepan. Add water and soak for 30 minutes. This ensures fluffy rice.
Step 3: Cook the Rice
Cover and bring to a boil. Reduce heat and simmer for 15 minutes without lifting the lid. Afterward, turn off heat and let sit covered for another 10 minutes.
Step 4: Season the Rice
Mix rice vinegar, sugar, and salt in a bowl until dissolved. Fold gently into the cooked rice.
Step 5: Prepare Chicken
Pound chicken breasts to an even thickness of about ½ inch. Season both sides with salt and pepper.
Step 6: Set Up Breading Station
Prepare three bowls: one with flour, one with beaten eggs, and one with panko breadcrumbs.
Step 7: Bread Chicken
Dredge chicken in flour first. Then dip in eggs before coating each side with panko breadcrumbs thoroughly.
Step 8: Fry Chicken
Heat vegetable oil in a skillet over medium heat. Fry chicken for 4–5 minutes on each side until golden brown and cooked through.
Step 9: Drain Chicken
Drain fried chicken on paper towels. Let rest before slicing into strips.
Step 10: Make Sauce
In a bowl, combine tonkatsu sauce, soy sauce, Worcestershire sauce, and ketchup. Mix well.
Step 11: Serve
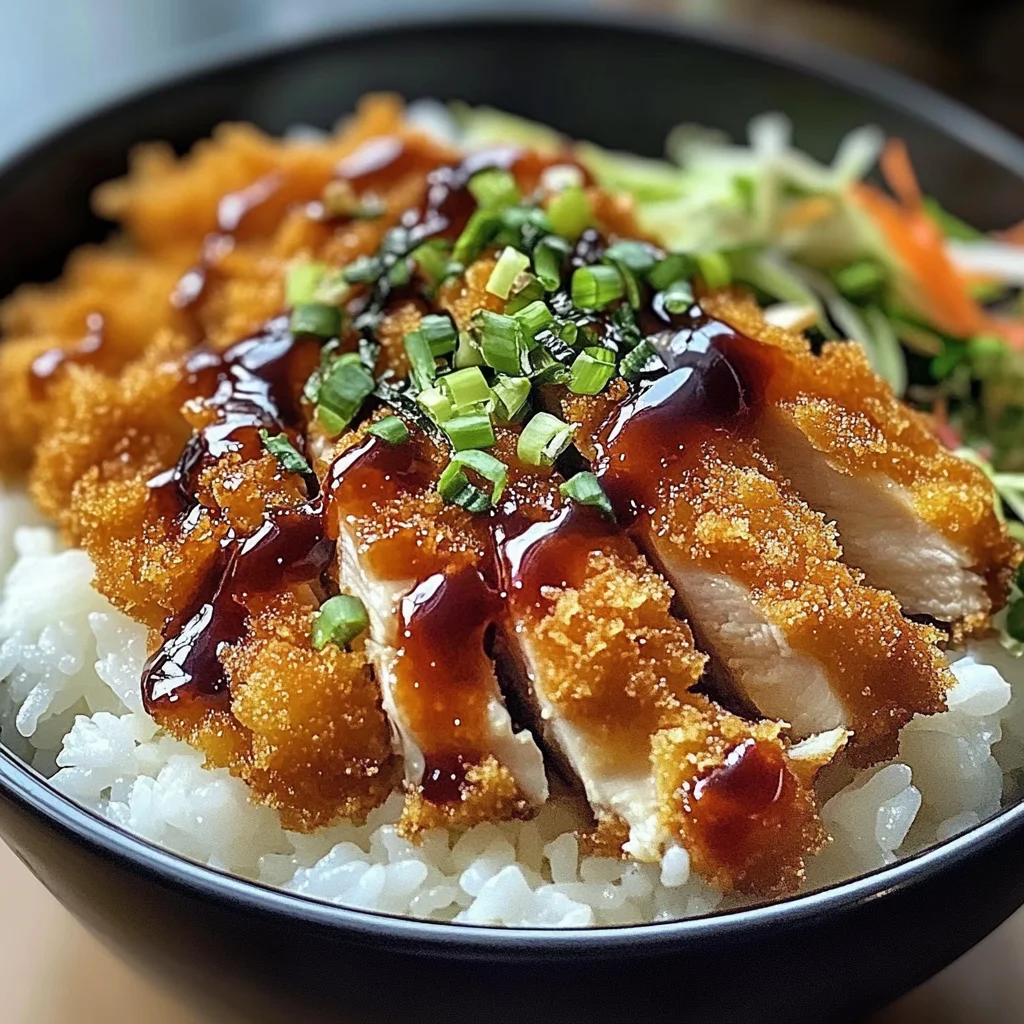
On a plate, serve rice topped with sliced katsu. Add shredded cabbage and green onions on top. Drizzle with prepared sauce and sprinkle sesame seeds. Garnish with pickled ginger if desired.
With these steps completed, you now have an authentic Japanese Katsu Bowl ready to be enjoyed!
How to Serve Japanese Katsu Bowls: A Delicious Guide to Making Authentic Katsu at Home
Serving Japanese Katsu bowls is not just about the dish itself; it’s an experience that can be enhanced with thoughtful presentation and accompaniments. Here are some serving suggestions to elevate your meal.
Garnish with Fresh Ingredients
- Shredded Cabbage: A crunchy texture that balances the crispy katsu.
- Green Onions: Adds a fresh, mild onion flavor to each bite.
- Sesame Seeds: Sprinkle on top for a nutty finish and visual appeal.
Sauces and Condiments
- Tonkatsu Sauce: The classic choice that adds sweetness and tang.
- Soy Sauce: A light drizzle can enhance flavor without overwhelming.
- Pickled Ginger: Offers a zesty contrast and aids digestion.
Presentation Tips
- Layering: Serve the rice on the bottom, topped with sliced katsu for a beautiful display.
- Color Contrast: Use a mix of vibrant garnishes to make the dish visually appealing.
How to Perfect Japanese Katsu Bowls: A Delicious Guide to Making Authentic Katsu at Home
Perfecting your Japanese Katsu bowls involves attention to detail in both cooking and presentation. Here are some tips for achieving the best results.
- Choose Quality Meat: Start with fresh, high-quality chicken or beef for better flavor and texture.
- Maintain Oil Temperature: Use a thermometer to ensure oil is hot enough (about 350°F) for frying; this prevents sogginess.
- Use Panko Breadcrumbs: They create the perfect crunchy coating compared to regular breadcrumbs.
- Rest Before Slicing: Let the fried katsu sit for a few minutes before cutting; this helps retain juiciness.
Best Side Dishes for Japanese Katsu Bowls: A Delicious Guide to Making Authentic Katsu at Home
Pairing side dishes with your Japanese Katsu bowls can enhance the overall dining experience. Here are some great options to consider.
- Miso Soup: A warm, savory broth that complements the flavors of katsu beautifully.
- Japanese Pickles (Tsukemono): These add a crunchy and tangy contrast to your meal.
- Steamed Edamame: Lightly salted edamame provides protein and is easy to prepare.
- Seaweed Salad: Offers a refreshing, slightly salty taste that pairs well with savory dishes.
- Vegetable Tempura: Crispy battered vegetables enhance the crunch factor of your meal.
- Cucumber Salad (Sunomono): A light, vinegary salad that cleanses the palate between bites.
Common Mistakes to Avoid
Making Japanese Katsu Bowls can be an enjoyable experience, but there are some common pitfalls that can affect the outcome. Here are a few mistakes to watch out for:
- Skipping the soaking step: Failing to soak the rice can lead to uneven cooking. Always soak the rice for 30 minutes before boiling to achieve the perfect texture.
- Using too much oil: Overcrowding the pan with oil can cause katsu to become greasy. Use just enough oil to cover the bottom of your skillet for a crispy finish.
- Not pounding the chicken evenly: Uneven thickness can result in some parts being undercooked. Pound the chicken breasts to a uniform thickness of about ½ inch.
- Neglecting seasoning: Forgetting to season your chicken will lead to bland katsu. Season with salt and pepper before breading for enhanced flavor.
- Overcooking the rice: Cooking rice too long can make it mushy. Follow the timing closely and let it rest afterward for optimal fluffiness.

Storage & Reheating Instructions
Refrigerator Storage
- Store leftover katsu in an airtight container.
- Refrigerate within two hours of cooking.
- Consume within 2-3 days for best quality.
Freezing Japanese Katsu Bowls: A Delicious Guide to Making Authentic Katsu at Home
- Wrap individual portions tightly in plastic wrap, then place them in a freezer-safe bag.
- Freeze for up to 3 months for optimal freshness.
Reheating Japanese Katsu Bowls: A Delicious Guide to Making Authentic Katsu at Home
- Oven: Preheat to 350°F (175°C). Place katsu on a baking sheet and heat for about 10-15 minutes until warmed through.
- Microwave: Use medium power and heat in short intervals, checking frequently until hot. This method may not keep katsu crispy.
- Stovetop: Heat a little oil in a skillet over medium heat. Add katsu and cook for about 5 minutes on each side until heated through.
Frequently Asked Questions
Here are some common questions about making Japanese Katsu Bowls.
What is Japanese Katsu?
Japanese Katsu refers to breaded and fried meat cutlets, typically served with rice, sauce, and vegetables.
Can I use beef instead of chicken?
Yes! Beef loin can be used as an alternative in Japanese Katsu Bowls, offering a different flavor profile while still being delicious.
How do I achieve crispy katsu?
To achieve crispy katsu, ensure you coat the meat thoroughly with flour, egg, and panko breadcrumbs and fry it at the right temperature.
Are Japanese Katsu Bowls customizable?
Absolutely! You can customize your katsu bowls by adding various toppings like pickled vegetables or different sauces according to your taste preferences.
How do I store leftover katsu?
Store leftover katsu in an airtight container in the refrigerator or freeze it for later enjoyment.
Final Thoughts
Japanese Katsu Bowls offer a delightful combination of flavors and textures that make them a perfect meal option any day of the week. With their crispy exterior and tender meat inside, these bowls are versatile and easy to customize with various toppings or sides. Give this recipe a try; you’ll love how simple it is to create authentic flavors at home!
Japanese Katsu Bowls
Savor the delightful experience of homemade Japanese Katsu Bowls, featuring crispy chicken or beef cutlets served over perfectly seasoned rice. This dish combines the irresistible crunch of panko breadcrumbs with a tangy homemade sauce, making it a favorite for family dinners or casual gatherings. Quick to prepare and customizable to suit your taste, these bowls are not only delicious but also easy to make, ensuring you’ll impress your guests without spending hours in the kitchen. Whether you’re new to cooking or a seasoned chef, this guide will help you create an authentic Japanese meal that brings comfort and flavor to your dining table.
- Prep Time: 20 minutes
- Cook Time: 40 minutes
- Total Time: 1 hour
- Yield: Serves 4
- Category: Dinner
- Method: Frying
- Cuisine: Japanese
Ingredients
- 2 boneless chicken breasts (or beef loin)
- 1 cup all-purpose flour
- 2 large eggs
- 1 cup panko breadcrumbs
- Vegetable oil for frying
- 2 cups Japanese short-grain rice
- ¼ cup tonkatsu sauce
- 1 tablespoon soy sauce
- 1 teaspoon ketchup
- 1 tablespoon rice vinegar
- 1 tablespoon sugar
- ½ teaspoon salt
- 1 cup shredded cabbage
- 2 green onions, sliced
- Sesame seeds for garnish
- Pickled ginger (optional)
Instructions
- Rinse the rice under cold water until clear, then soak it in water for 30 minutes.
- Cook the soaked rice in a saucepan with water; bring to a boil, reduce heat, cover, and simmer for 15 minutes.
- Meanwhile, pound chicken or beef to an even thickness and season with salt and pepper.
- Set up three bowls: one for flour, one for beaten eggs, and one for panko breadcrumbs.
- Dredge meat in flour, dip in eggs, then coat evenly with panko.
- Heat vegetable oil in a skillet over medium heat and fry the coated meat until golden brown on both sides (about 4–5 minutes each side).
- Drain on paper towels before slicing into strips.
- Prepare the sauce by mixing tonkatsu sauce with soy sauce and ketchup.
- Serve warm rice topped with sliced katsu, garnished with cabbage, green onions, sesame seeds, and drizzle with sauce.
Nutrition
- Serving Size: 1 serving
- Calories: 550
- Sugar: 3g
- Sodium: 600mg
- Fat: 22g
- Saturated Fat: 3g
- Unsaturated Fat: 18g
- Trans Fat: 0g
- Carbohydrates: 66g
- Fiber: 2g
- Protein: 27g
- Cholesterol: 120mg