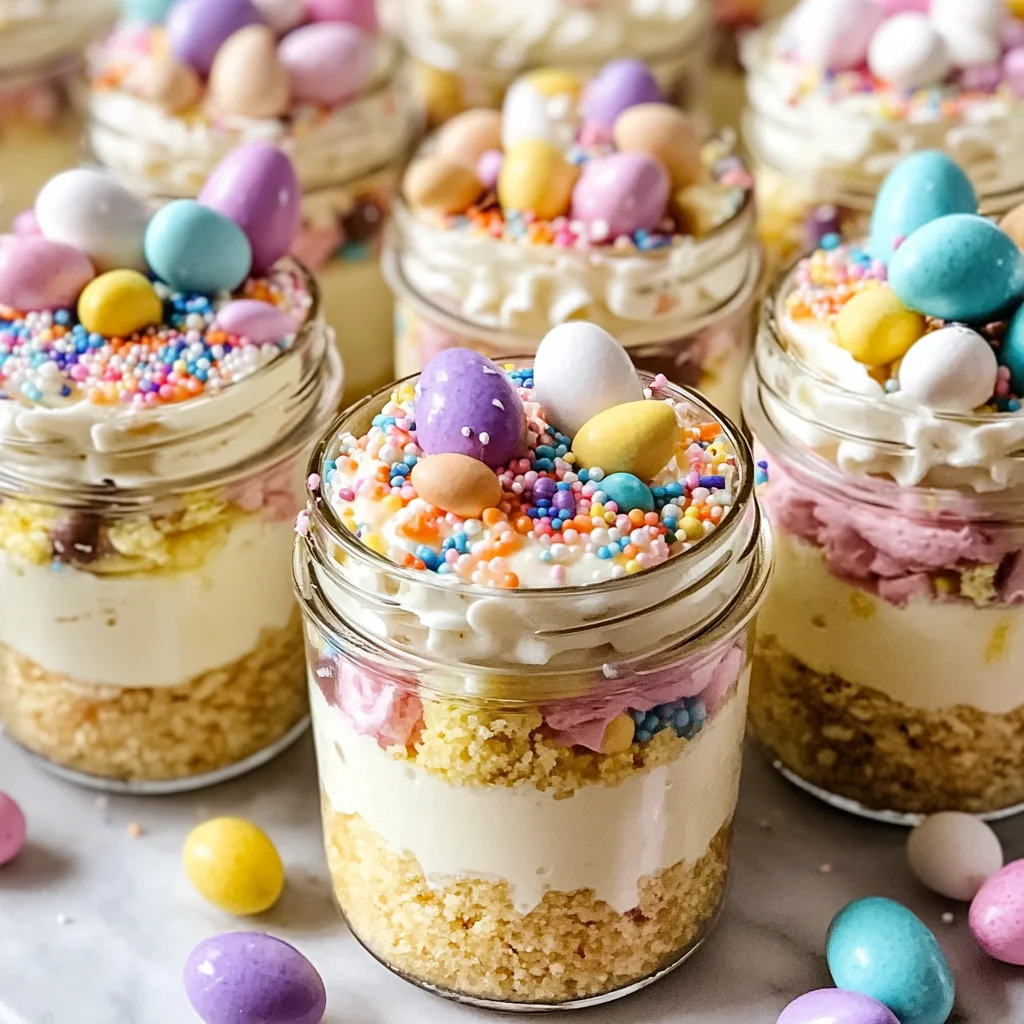
Mini Easter Cheesecake Jars – A Cute, No-Bake Spring Dessert
Mini Easter Cheesecake Jars – A Cute, No-Bake Spring Dessert are the perfect treat for your spring celebrations. These delightful mini desserts combine creamy cheesecake filling with a crunchy crust, making them a hit at any gathering. Ideal for Easter parties, picnics, or simply enjoying at home, these jars are as cute as they are delicious. The no-bake aspect means you can whip them up quickly, allowing you to spend more time with loved ones and less time in the kitchen.
Why You’ll Love This Recipe
- Quick and Easy: This no-bake dessert requires minimal preparation, making it perfect for last-minute gatherings.
- Customizable: You can easily adjust flavors and colors to fit any occasion or personal preference.
- Kid-Friendly Fun: Kids will love helping decorate their own jars with toppings like sprinkles and mini eggs.
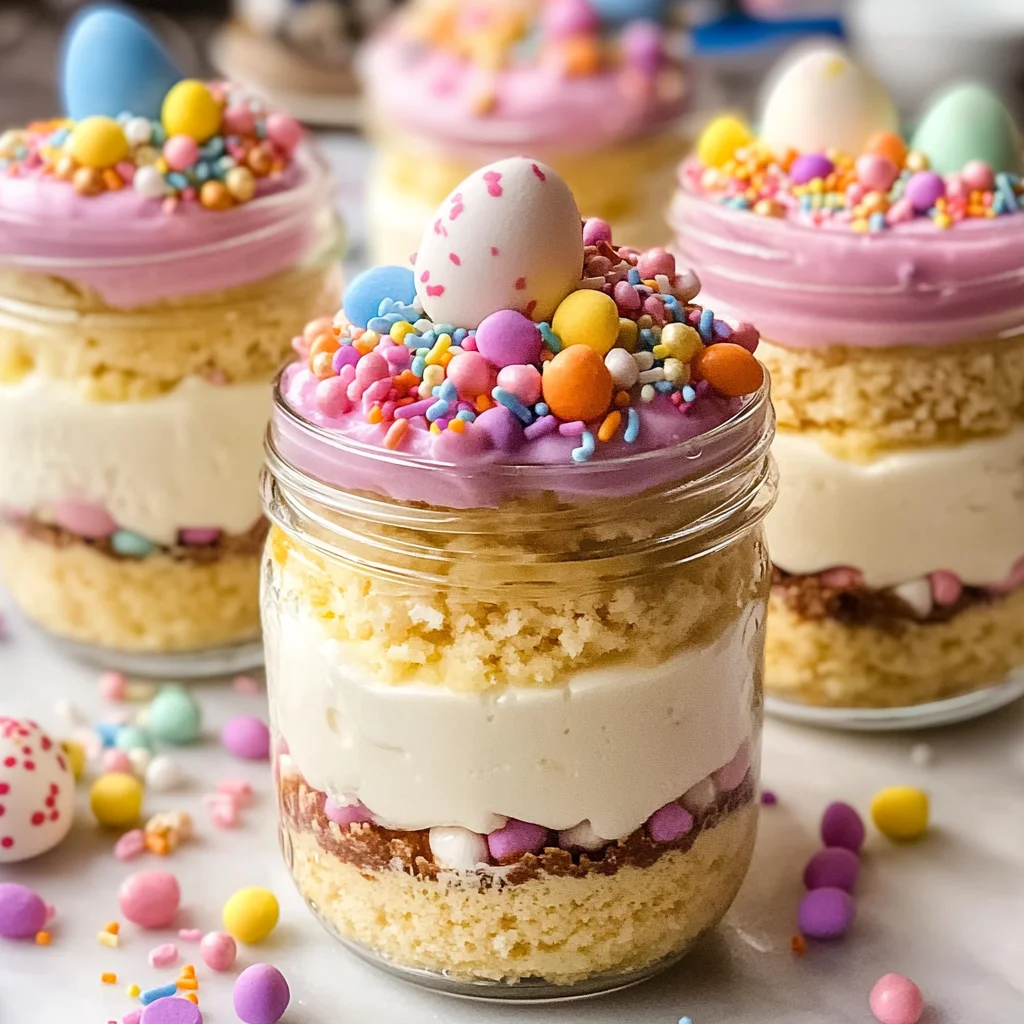
- Beautiful Presentation: The layered look in transparent jars creates an eye-catching display that impresses guests.
- Deliciously Creamy: The combination of cream cheese and whipped cream results in a rich, satisfying texture that everyone will enjoy.
Tools and Preparation
Before diving into the recipe, gather your tools and equipment for an organized cooking experience.
Essential Tools and Equipment
- Small jars (4–6 oz)
- Mixing bowls
- Hand mixer
- Piping bag or spoon
Importance of Each Tool
- Small jars: Perfect for individual servings, making it easy to serve and share.
- Hand mixer: Whips the heavy cream quickly to achieve the right consistency for a fluffy filling.
- Piping bag or spoon: Allows for precise filling of jars to create beautiful layers.
Ingredients
For the Crust
- 1 1/2 cups grachicken chicken ham cracker crumbs (or digestive biscuits)
- 5 tablespoons unsalted butter (melted)
- 2 tablespoons sugar
- Pinch of salt
For the Cheesecake Filling
- 12 oz cream cheese (softened)
- 1/2 cup powdered sugar
- 1 teaspoon vanilla extract
- 1 tablespoon lemon juice
- 1 cup cold heavy whipping cream
For Color and Flavor (Optional)
- A few drops of gel food coloring (pastel shades)
- Lemon zest or almond extract to taste
For Toppings
- Mini chocolate eggs or jelly beans
- Pastel sprinkles
- Shredded coconut (optional, dyed green for “grass”)
How to Make Mini Easter Cheesecake Jars – A Cute, No-Bake Spring Dessert
Step 1: Make the Crumb Base
Start by preparing the crust for your cheesecake jars.
1. Stir together grachicken chicken ham crumbs, sugar, salt, and melted butter until it resembles wet sand.
Step 2: Pack the Crust
Next, pack the crumb mixture into your jars.
1. Spoon 2–3 tablespoons into each jar and press down firmly with the back of a spoon. Set aside.
Step 3: Whip the Cream
Now it’s time to make the creamy filling.
1. In a cold bowl, whip heavy cream until medium-stiff peaks form. Chill while you prepare the cheesecake base.
Step 4: Beat the Cream Cheese
Create a smooth mixture for your cheesecake layer.
1. Mix softened cream cheese, powdered sugar, vanilla extract, and lemon juice until smooth and fluffy, about 1–2 minutes.
Step 5: Fold it Together
Combine the whipped cream with your cheesecake mixture for a light texture.
1. Gently fold the whipped cream into the cream cheese mixture in two additions until no streaks remain.
Step 6: Add Color (Optional)
Give your filling a fun spring touch!
1. Divide the mixture if desired and tint with pastel gel food coloring—keeping it light enhances its appeal.
Step 7: Fill the Jars
Layer your filling beautifully over the crust.
1. Pipe or spoon the cheesecake filling into each jar over the crust while leaving some space for toppings.
Step 8: Chill
Allow your cheesecakes to set properly.
1. Cover each jar and refrigerate for at least 2 hours or up to 24 hours before serving.
Step 9: Decorate
Add festive touches just before serving!
1. Top with shredded coconut “grass,” sprinkles, and nestle mini eggs on top so they remain crisp.
Step 10: Serve Cold
Enjoy this delightful dessert!
1. Hand out with small spoons so everyone can enjoy their creamy creation!
How to Serve Mini Easter Cheesecake Jars – A Cute, No-Bake Spring Dessert
Serving Mini Easter Cheesecake Jars can make your gathering special and festive. Here are some fun ways to present these delightful treats that will impress your guests and enhance the spring vibe.
Individual Place Settings
- Use small decorative plates to set each jar on, adding a touch of elegance.
- Include a tiny spoon at each setting for easy enjoyment.
Easter-Themed Table Decor
- Arrange the jars in a basket lined with pastel-colored tissue paper.
- Add faux flowers or Easter eggs around the jars for a cheerful presentation.
Party Favors
- Wrap each jar with cellophane and tie it with a ribbon as a sweet take-home gift.
- Attach a small tag with the recipe or a festive greeting.
Dessert Buffet Display
- Create a dessert table featuring different flavors of Mini Easter Cheesecake Jars.
- Use tiered stands to add height and visual interest.
Kids’ Table Setup
- Serve the jars alongside colorful plates and fun napkins to attract kids.
- Include toppings like mini chocolate eggs for an interactive treat experience.
How to Perfect Mini Easter Cheesecake Jars – A Cute, No-Bake Spring Dessert
Perfecting your Mini Easter Cheesecake Jars is key to impressing family and friends. Follow these tips for the best results!
- Use room temperature ingredients: Allow cream cheese and heavy cream to reach room temperature for easier mixing and smoother texture.
- Chill before serving: Refrigerate the jars for at least 2 hours to ensure they set properly and develop their full flavor.
- Whip cream correctly: Beat the heavy cream until medium-stiff peaks form; this will provide perfect fluffiness in your cheesecake filling.
- Be gentle when folding: Carefully fold the whipped cream into the cream cheese mixture to keep it light and airy without deflating.
- Opt for pastel colors: Use gel food coloring sparingly to create soft pastel shades that evoke spring without overpowering the dessert’s natural look.
- Add seasonal toppings: Top with coconut “grass,” sprinkles, or mini chocolate eggs for extra color and fun!
Best Side Dishes for Mini Easter Cheesecake Jars – A Cute, No-Bake Spring Dessert
When planning your celebration, consider these delightful side dishes that complement Mini Easter Cheesecake Jars perfectly. Each option adds variety while keeping with the festive theme.
- Fresh Fruit Salad: A vibrant mix of seasonal fruits like strawberries, blueberries, and kiwi enhances freshness and balances sweetness.
- Vegetable Platter: Crunchy veggies such as carrots, cucumbers, and bell peppers served with hummus provide a healthy contrast to rich desserts.
- Mini Quiches: Bite-sized quiches filled with spinach or cheese offer savory relief from sweet treats, making them great for brunch.
- Spring Pasta Salad: Light pasta salad tossed with asparagus, cherry tomatoes, and a lemon vinaigrette complements the cheesecakes beautifully.
- Caprese Skewers: Cherry tomatoes, fresh basil, and mozzarella balls drizzled with balsamic glaze create an elegant finger food option.
- Herbed Couscous: Fluffy couscous mixed with herbs adds a flavorful side that pairs well with both sweet and savory dishes.
- Garlic Breadsticks: Soft breadsticks brushed with garlic butter provide delicious dipping opportunities alongside lighter fare.
- Cheese Board: An assortment of cheeses paired with crackers can be an excellent addition that appeals to diverse tastes while being easy to assemble.
Common Mistakes to Avoid
Making Mini Easter Cheesecake Jars can be a delightful experience, but certain pitfalls can affect the final outcome.
- Bold preparation: Not allowing the cream cheese to soften can lead to lumps in the filling. Always let it sit at room temperature for about 30 minutes before mixing.
- Bold crust consistency: Using too much or too little melted butter can alter the texture of the crust. Aim for a wet sand-like consistency for optimal firmness.
- Bold whipping cream: Overwhipping the heavy cream can result in grainy filling. Stop when medium-stiff peaks form to maintain a smooth texture.
- Bold chilling time: Not chilling the jars long enough may prevent the cheesecake from setting properly. Aim for at least 2 hours in the refrigerator.
- Bold topping timing: Adding toppings too early can make them soggy. Wait until just before serving to add sprinkles and mini eggs for best results.
Storage & Reheating Instructions
Refrigerator Storage
- Store Mini Easter Cheesecake Jars in airtight containers to keep them fresh.
- They will last up to 3 days in the refrigerator.
Freezing Mini Easter Cheesecake Jars – A Cute, No-Bake Spring Dessert
- You can freeze these cheesecakes for up to 2 months.
- Ensure they are tightly wrapped or placed in freezer-safe containers.
Reheating Mini Easter Cheesecake Jars – A Cute, No-Bake Spring Dessert
- Oven: Not recommended as these cheesecakes are best served cold.
- Microwave: If necessary, defrost on low power for 10-15 seconds at a time.
- Stovetop: Not applicable; these are served chilled.
Frequently Asked Questions
If you have questions about making Mini Easter Cheesecake Jars, we’ve got you covered!
How long do Mini Easter Cheesecake Jars last?
These jars can last up to 3 days in the refrigerator if stored properly.
Can I customize my Mini Easter Cheesecake Jars?
Absolutely! You can add different flavors like almond extract or use various toppings like fresh fruit.
Can I make these Mini Easter Cheesecake Jars ahead of time?
Yes, you can prepare them a day or two in advance. Just ensure they chill well before serving.
Are Mini Easter Cheesecake Jars suitable for parties?
Definitely! These jars are perfect for gatherings as they are easy to serve and eat.
Final Thoughts
Mini Easter Cheesecake Jars – A Cute, No-Bake Spring Dessert are not just fun to make but also versatile. You can customize them with different flavors and toppings to suit your taste. Try this recipe for your next gathering and delight your guests with this charming treat!
Mini Easter Cheesecake Jars – A Cute, No-Bake Spring Dessert

Mini Easter Cheesecake Jars are a delightful no-bake dessert perfect for spring celebrations. These adorable jars combine creamy cheesecake filling with a crunchy graham cracker crust, making them an instant favorite at any gathering. Quick to prepare and easy to customize, these treats are as visually appealing as they are delicious. Ideal for Easter parties, picnics, or simply enjoying at home, each jar can be topped with colorful sprinkles and mini chocolate eggs, adding a fun touch that kids will love. Spend less time in the kitchen and more time celebrating with loved ones by whipping up these charming desserts!
- Prep Time: 20 minutes
- Cook Time: None
- Total Time: 0 hours
- Yield: Makes approximately 6 servings 1x
- Category: Dessert
- Method: No-Bake
- Cuisine: American
Ingredients
- 1 1/2 cups graham cracker crumbs
- 5 tablespoons unsalted butter (melted)
- 12 oz cream cheese (softened)
- 1 cup cold heavy whipping cream
- 1/2 cup powdered sugar
- 1 teaspoon vanilla extract
- 1 tablespoon lemon juice
- Optional: gel food coloring, lemon zest, mini chocolate eggs for decoration
Instructions
- In a bowl, mix graham cracker crumbs, melted butter, sugar, and salt until crumbly.
- Pack the mixture into small jars (2–3 tablespoons per jar) and set aside.
- In another bowl, whip the cold heavy cream to medium-stiff peaks and set aside.
- Blend softened cream cheese, powdered sugar, vanilla extract, and lemon juice until smooth.
- Gently fold whipped cream into the cream cheese mixture until fully combined.
- If desired, add pastel gel food coloring for a festive look.
- Layer the cheesecake filling over the crust in each jar, leaving space for toppings.
- Refrigerate for at least 2 hours before serving.
- Decorate with sprinkles and mini chocolate eggs just before serving.
Nutrition
- Serving Size: 1 jar (120g)
- Calories: 330
- Sugar: 21g
- Sodium: 180mg
- Fat: 24g
- Saturated Fat: 14g
- Unsaturated Fat: 10g
- Trans Fat: 0g
- Carbohydrates: 27g
- Fiber: 1g
- Protein: 4g
- Cholesterol: 60mg